|
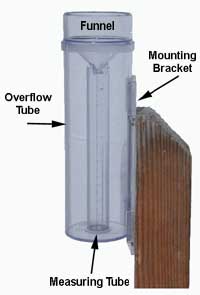
Instructions for mounting your Rain Gauge.
|
When installing the rain gauge it is important to
consider its location. The gauge should be placed in an area that is
protected from strong winds but is not bothered by obstacles that could
either block precipitation from reaching the gauge or cause
precipitation to splash towards it. For example, an ideal location would
be a small open meadow surrounded by forest, or an open back yard not
too close to buildings or trees.
The gauge should be installed 2-5 feet above the ground
mounted on the side of a single post. The top of the rain gauge should
extend several inches above the top of the mounting post. The mounting
post should have a rounded, pointed, or slanted top to avoid upward
splash towards the rain gauge. Click here to view some ideas for alternatives to digging a hole.
|
 |
The rain gauge should be installed at a reasonable distance away from
obstacles such as buildings and trees. For example, if a tree is 40ft.
tall (taller than a two story house) the gauge should be placed at least
80ft. downwind from it. This will help avoid potential blockage of the
rain gauge. It is not always possible to find a perfect location. When
in doubt, do your best.
Things to Remember: When mounting a rain gauge.
- Avoid large obstacles that could block precipitation.
- Avoid mounting the rain gauge where sprinklers or other sources of artificial precipitation can affect the data.
- Make sure the top of the rain gauge is level.
- Mount the rain gauge so that heavy rain could not splash into the gauge from any nearby surfaces.
- Mount the rain gauge in an area protected from strong wind, if possible.
Maintenance.
Please clean rain gauge periodically using a mild detergent and a soft bottlebrush. Do Not let water freeze inside the gauge as it can cause the plastic to crack. During the summer, make sure no water from nearby sprinkler systems can get in your gauge.
Instructions for mounting your Hail Pad.
Hail Pad: The pad must be mounted on a solid base such as a ½" - ¾" piece of plywood or particle board about 14-inch square painted white (which can also be used as a snowboard in winter) using metal clips to hold it securely. The metal clips can be 1 -1/2" or 1-3/4" L-screws. Pre-drill the board and hand tighten 3 or 4 L-screws to hold the hail pad firmly in place. Place the pad in an area free from any obstacles that would hinder or exaggerate the hail impact (i.e. vegetation, buildings). Make sure that the pad is horizontal to the ground and that nothing will block the falling hail from reaching the pad. Always orient the hails pad the same way and mark on the edge of the pad which direction is north. It is important to know the directions in order to analyze the dents that hail will make on the pads.
Things to Remember: When mounting a hail pad.
- Avoid large obstacles that could block falling hail.
- Avoid placing pad near walls, buildings with slanted roofs, or other structures that might concentrate and exaggerate the number of hailstones striking the hail pad.
- Use mounting clips to prevent pad from blowing away in the wind.
- Mount the hail pad horizontally and fasten it to a hard surface
- Always position the hail pad the same, and mark the directions on the side of the hail pad.
Check hail pad regularly to make sure accidental damage has not occurred. Replace it if necessary.
|